
This is a continuation of the post: 4 Simple Photography Techniques for Amazing Sparkler Photos.
This tutorial introduces off-camera flash to painting with light sparkler photos, which help “freeze” your subjects in place within your photos. The added flash brightens your subjects and also eliminates unwanted movement blur from long exposures.
Level of Difficulty: Expert
You’ll need to know basic painting with light techniques, as well as off-camera lighting setups and settings on your lights. Most importantly, you’ll need to know how to set up the rear-curtain (aka, second curtain) sync on your flashes.
What You Need:
- Camera Body with Bulb Mode
- Portrait Lens
- Sturdy Tripod
- Remote Camera Trigger (not required, but highly recommended)
- 36″ Sparklers
- 2x Off-Camera Speedlights on Tripods, with Manual Settings & Rear Curtain Sync
- 1x On-Camera Speedlight
- 3x – Radio Flash Triggers (one transmitter, two receivers) (I use Phottix Strato)
- Photography Assistant
- Small Flashlight (for focus assist)
- Darkness. This shot works best at least 60 minutes after sundown. There should be as little ambient light as possible, and minimal light sources in your backdrop.
Camera & Lens: Canon 5D MIV & 35mm f/1.4 // Exposure: Bulb // Aperture: f/9 //
Shutter Speed: 23 seconds // ISO: 1000 // Focus: Back-Button Focus at Center Point
STEP 1: Get your equipment set and tested in advance.
Set your gear up according to the notes below, and then use the remote camera trigger to test it. If set up correctly, your camera’s shutter should open when you hold the trigger down, and the flashes should go off right before you let the trigger up.
Bulb Mode:
For this technique, I strongly recommend Bulb Mode on your camera. Bulb mode allows you to set your exposure to any length you want. You could technically use manual and choose a long exposure setting, but you’ll get the best results by being exact.
Tripod & Remote Camera Trigger:
Lock your camera into a sturdy tripod, and plug in the remote trigger. A trigger is important, because in bulb mode, your assistant will be manually opening/closing the shutter. If you bump the camera by using the shutter button on your camera, your photo may end up blurry.
Exposure Settings:
Set your aperture to f/9.0, and ISO to 800. These are starting points, but you may need to make adjustments based on your location (backdrop, ambient light, etc.)
Remote Triggers:
I use three Phottix Strato remote triggers — one transmitter in my camera’s hotshoe, and two receivers. The receivers are paired with an off-camera flash, on a light stand.
Off-Camera Manual Flash Settings:
Set the output flash power to 1/4, and the flash zoom to 35.
You will want your OCFs set to rear-curtain sync (sometimes also called Second Curtain). If you’re not familiar with rear-curtain sync, it means that your speedlights will flash right before your shutter closes (normally, they go off when the shutter opens). This step cannot be skipped — the flash at the end of your exposure is what freezes your subjects in frame with a crispness that can’t usually be achieved in other ways.
In my experience, all of your flashes will need to be set to rear-curtain, including the one on your camera (if you have one). If you have a speedlight on your camera, it can be set to the lowest light power setting.
STEP 2: Bring your assistant and pre-set your gear outside for the shot
A few things to keep in mind:
Ambient Light & Backdrop
It needs to be dark for this shot to be successful. Twenty minutes after sunset with a long exposure will result in an overblown shot. I recommend at least 60 minutes after sunset, though you could push to 45 if you’re in a place without extra ambient light.
Off-Camera Flashes
Set flashes about 45 degrees away from where you plan to place your couple, with the flash heads aimed directly towards them. They should be placed as close as possible to the couple without being in your frame.
Note: This photo can also be done with a single off-camera flash, but I love the look of two better.
Camera on Tripod
Center this to your frame, and preset your tripod’s height and the frame of your shot to ensure you have extra room for sparkler writing.
Assistant Role
During the shoot, your assistant will be responsible for the remote shutter. I always have my assistant practice, just to make sure they understand their job. I am always very clear to let my assistant know that I will use the words “HOLD” as their indicator to push the remote to open the shutter, and “RELEASE” to remove their thumb from the remote, which sets off the flashes and closes the shutter.
Quick Test:
Once you’re in place, test a couple shots with your assistant to ensure your flashes are still synced.
STEP 3: Photography
Place the Couple:
Bring your couple out for their photos! Place them where you’d like and instruct them that this is their spot. Their job is not to move from that spot — you and your assistant will do the rest. Check your camera’s framing once more, and also run a test shot to ensure the flashes are still synced, making final adjustments as needed.
Grab Focus:
Use your small flashlight to grab focus through your camera, and once you have your lens focused, TURN OFF the auto focus directly on your lens.
Pre-Photos:
I always walk my couples through what’s going to happen during these photos — basically, their job is to hold as still as possible (while maybe holding a sparkler, depending on what we’re doing). I inform them that my assistant will be running the camera, while I’ll be doing the sparkler work around them. I usually ask my couple to hold a kiss with their eyes closed during our photos (the off-camera flash will be bright, and sometimes people will blink, especially if they’re looking towards the camera; it’s also easiest to hold a simple pose).
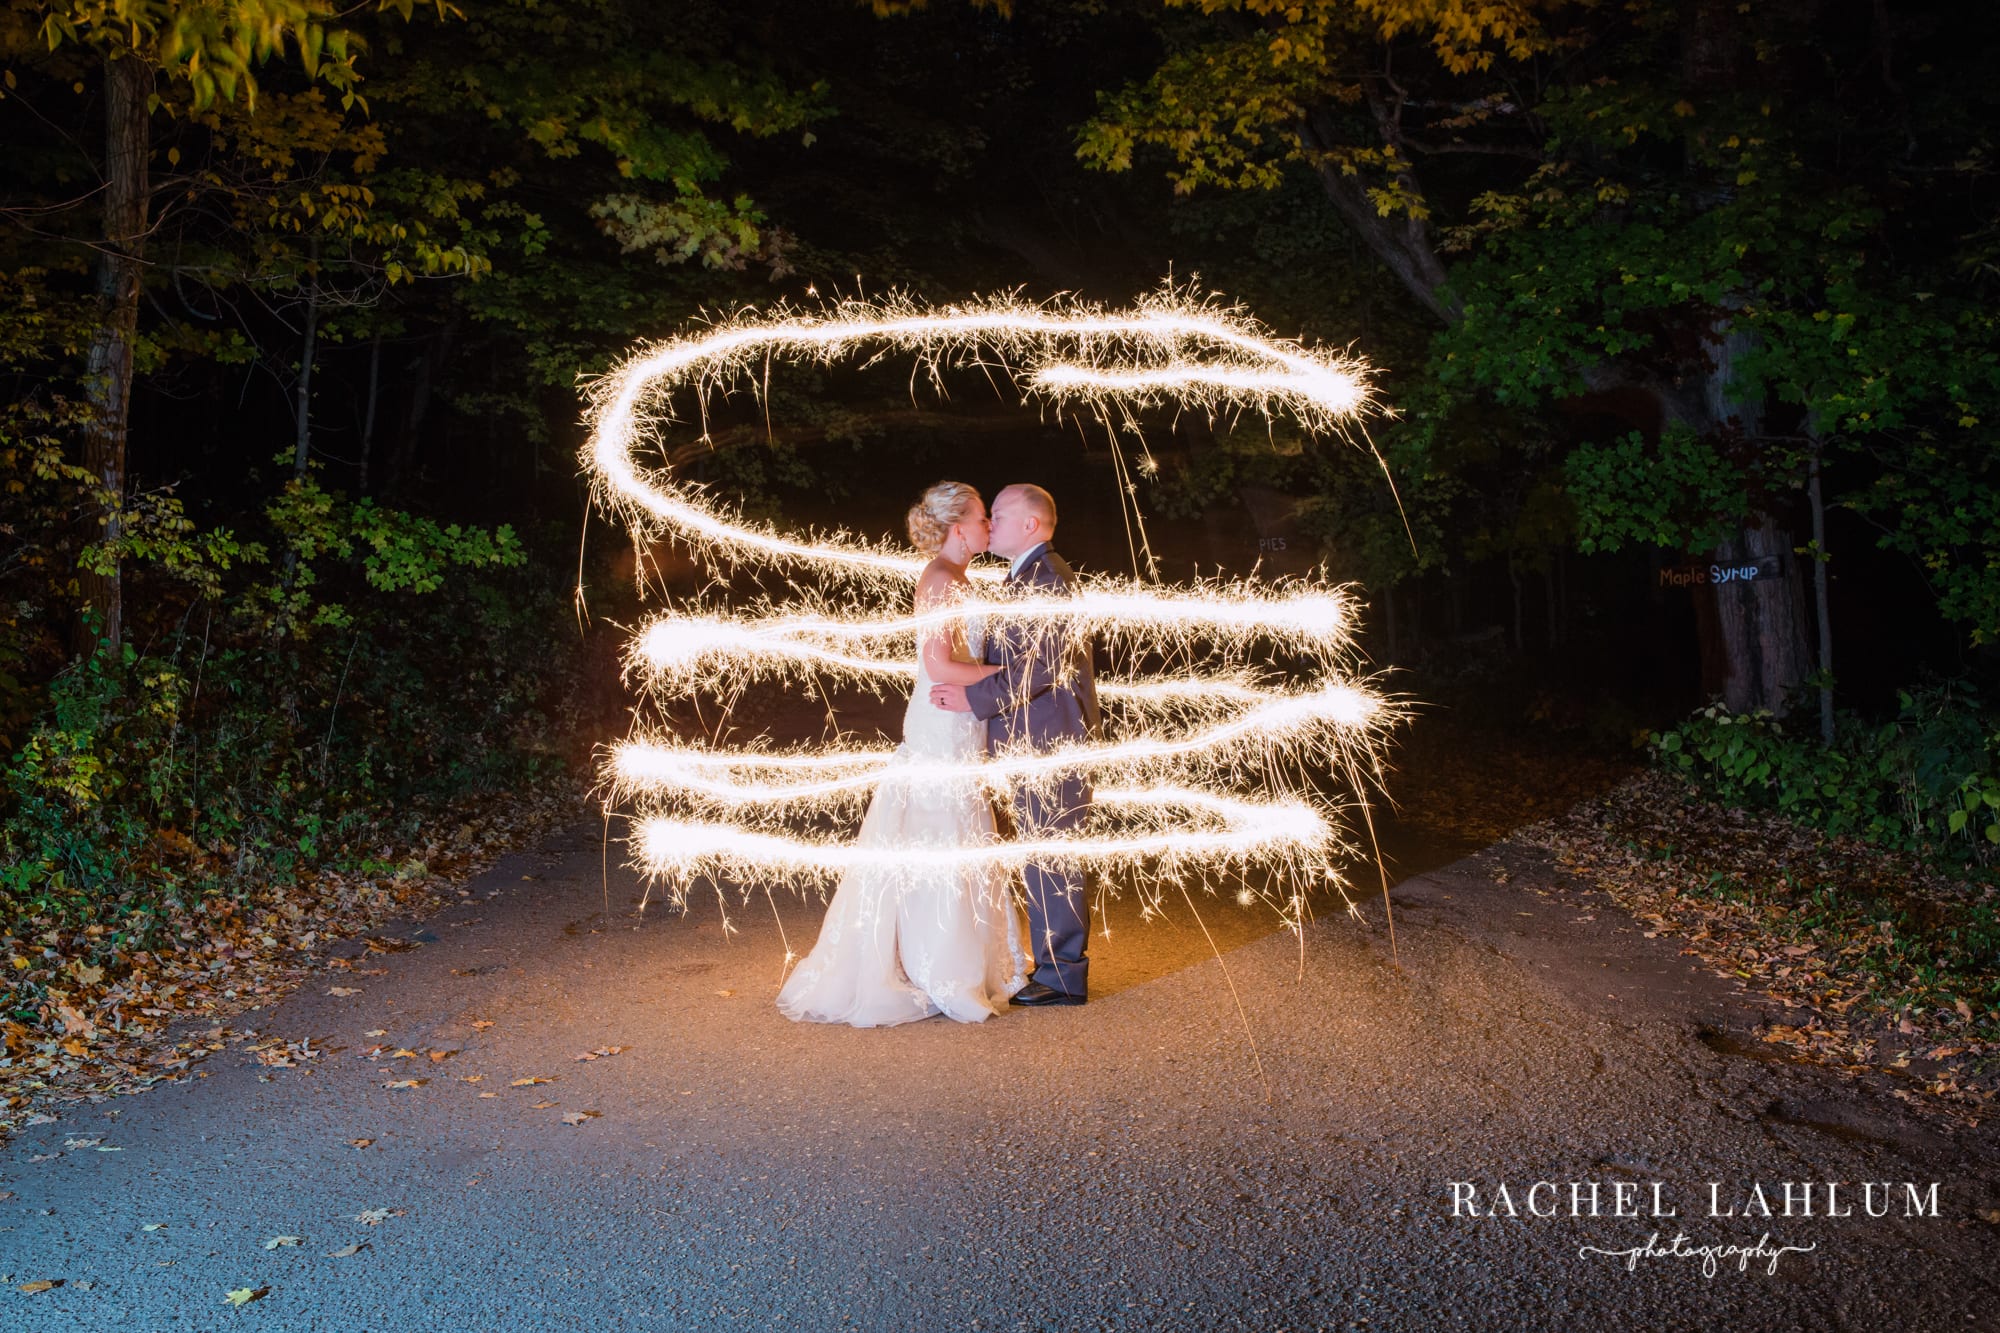
Sparkler Photos:
Light one of your 36″ sparklers, and bring it with you into the frame. For the spiral image, I like to start by standing behind the couple, with the sparkler above and slightly behind their heads. Your couple can hold a kiss, or touch their foreheads together, or something similar – so long as they can hold the pose for 20+ seconds.
Say the word “HOLD” to have your assistant begin the photo, and slow walk around the couple while trailing the sparkler behind you.Walk steadily — running will create a bouncy light trail — and spiral from top to bottom around the couple. Make sure not not to draw your sparkler line in front of your couple’s faces! To complete the image, either walk out of the frame, or crouch down to hide behind the couple. Tell your assistant to “RELEASE” the shutter, which will trigger the flashes to go off, freezing the couple in the frame.
Check the image on your camera’s screen — did it work as planned? Great! You can now use the rest of your sparklers for other types of shots. Want to make an adjustment to your light painting? Go for it!
Sparkler Photo Variations:
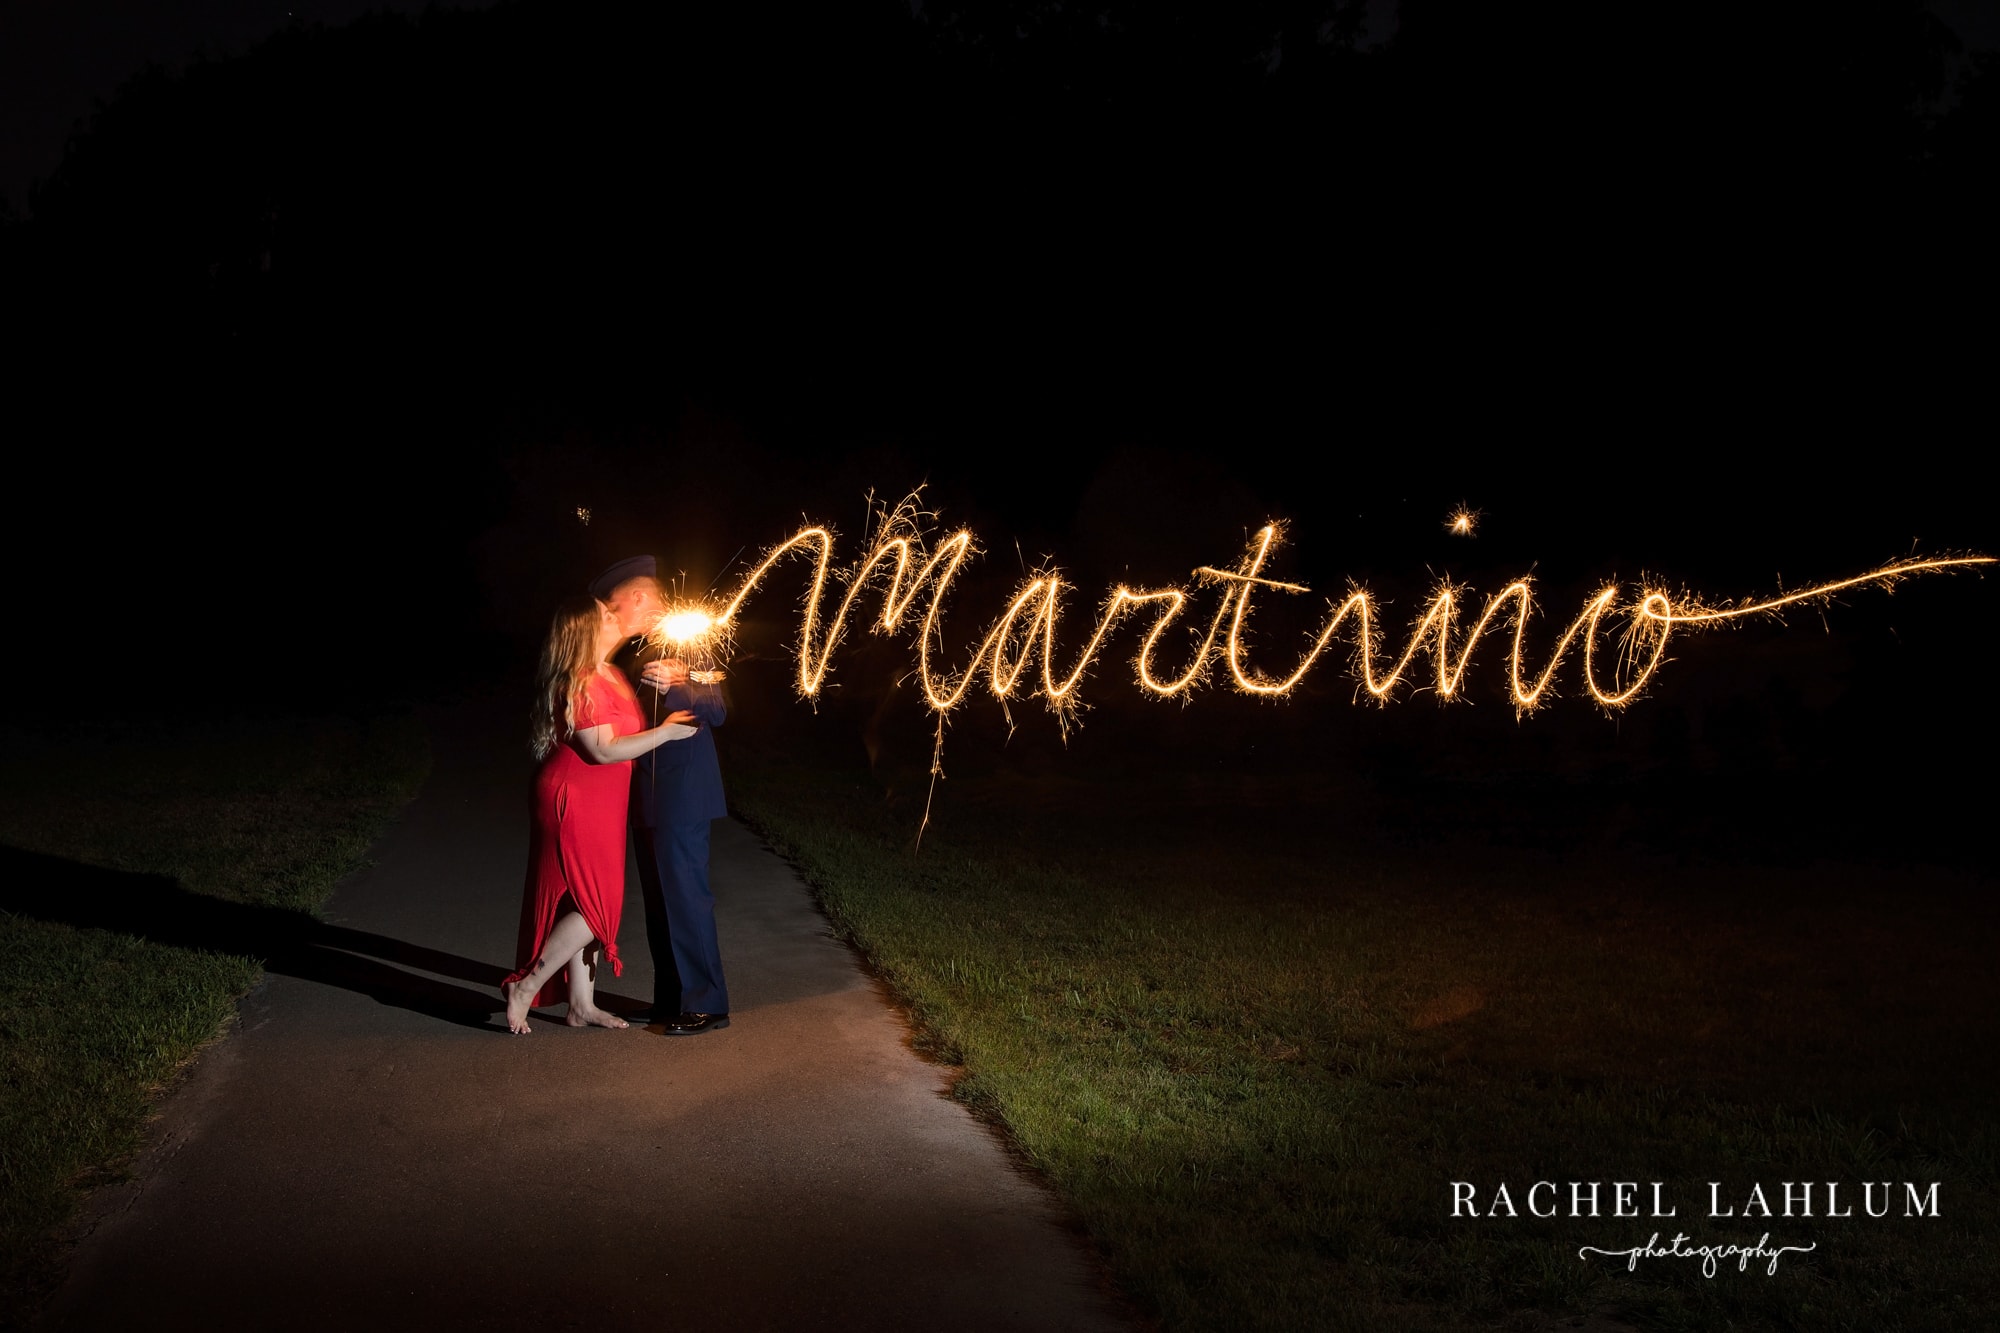
Cursive Love: Use two sparklers for this shot. Have the couple hold one, while you write the word “Love” in cursive. Start the image by matching your sparkler to theirs, standing slightly off and to the right (you don’t need to write backwards – just pretend you’re at a blackboard, and write with your arm extended, so you don’t cover any of the sparkler with your body). Walk out of the frame and have your assistant release the shutter. to complete the photo.

Camera & Lens: Canon 5D MIV & Sigma 20mm f/1.4 // Exposure: Bulb // Aperture: f/9 //
Shutter Speed: 6.2 seconds // ISO: 160 /. Focus: Back-Button Focus at Center Point
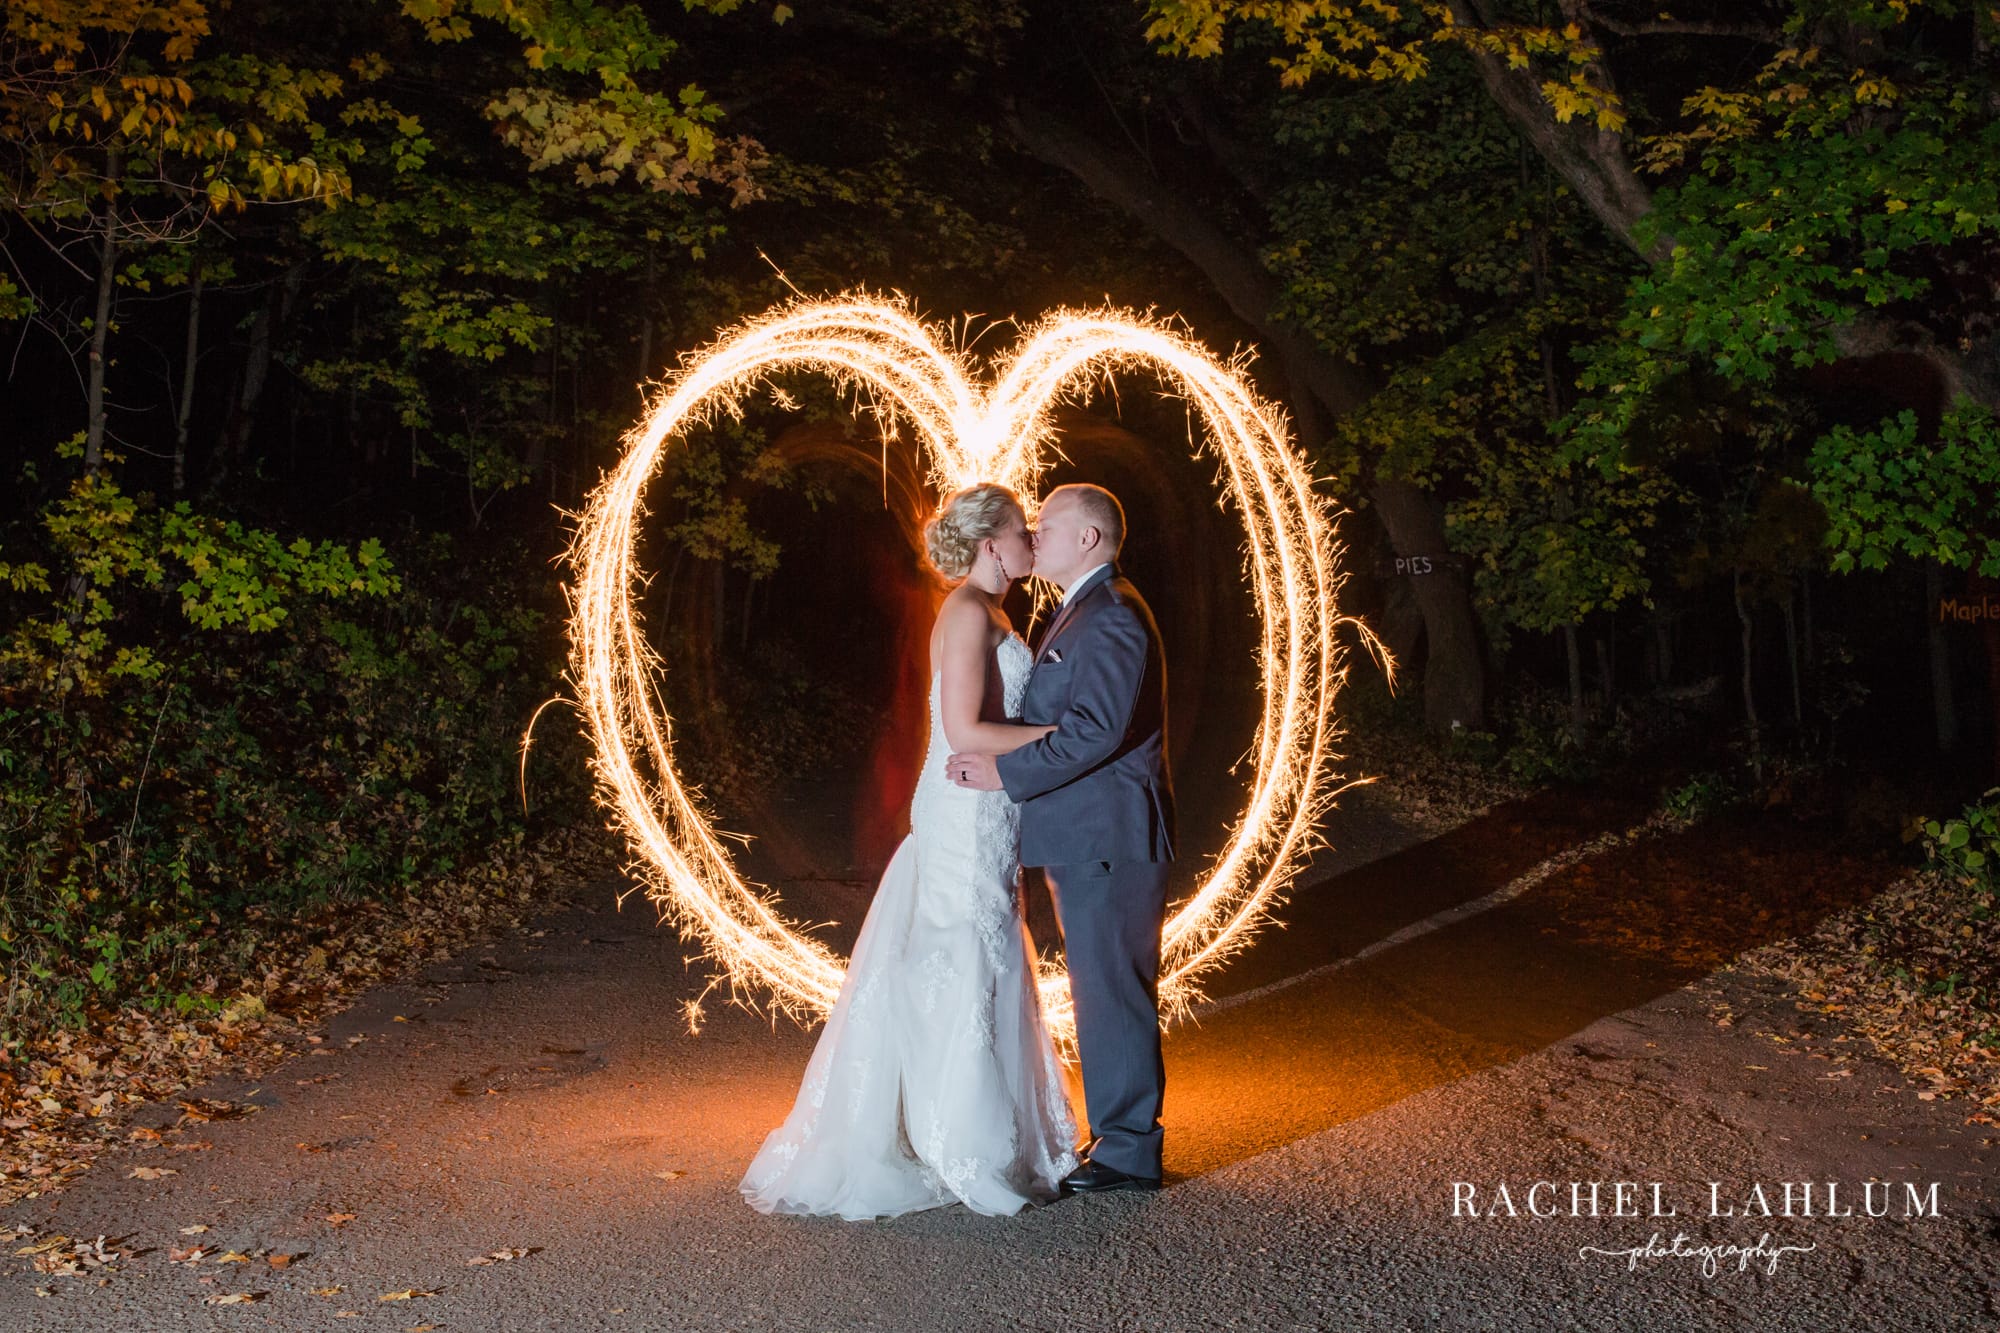
Heart: Use one or two sparklers to create a giant heart surrounding. the couple. Start by standing behind them, and either hide behind them when you’re done, or walk off frame but hide the sparklers from the camera to avoid unwanted light trails.
Custom Message: How do you feel about your handwriting? Try a more challenging cursive message that’s custom to the couple. You can try their last name, a thank you message, or even something they request!
Planning a wedding? Let’s chat photography!
Rachel Lahlum is an award-winning Minneapolis wedding photographer with experience in hundreds of weddings and engagement sessions. She takes a guided approach towards working with couples, from helping with planning and scheduling, to guiding with poses and prompts during the session. Her photography is crisp, clean and bright, with true-to-life colors and a mix of traditional poses and candid moments.